In this post, we’ll go over how to create an experiment where people are randomly assigned to one of two groups and, more importantly, how to export their data as a CSV (comma separated values) file. CSV files are essentially spreadsheets that can be read by Excel, Google Sheets, R, SPSS, or whatever you use to examine data.
What you’ll end up with
We will randomly assign the participant to either a control group or an experimental group. The experimental group will be shown some messages describing the difference between expressionist and impressionist paintings. The control group won’t. Both groups will eventually start the learning phase, where they will be shown a few labelled examples of expressionist and impressionist paintings. The control group will only have these examples to learn the difference. The experimental group will have read a description of how they differ to supplement the examples. For the test phase, both groups will be shown new paintings without labels. They will be asked to categorize each painting as “expressionist” or “impressionist”.
(Not that you asked, but if we were to run this study for real, with a lot more stimuli and varying levels of instructions, I think you’d have a very hard time improving people’s ability to be able to distinguish random, unfamiliar examples of “expressionist” and “impressionist” paintings.)
Preparing image files
To get your psychopy script to access files on your computer, it’s easiest to put folders of stimuli you plan on using in the same folder the “.py” script is saved in. I created folders called “Expressionist”, “Impressionist”, and “Test”. I did a Google Image search and filled these folders with equal amounts of .JPG files for the different painting styles, as pictured below.
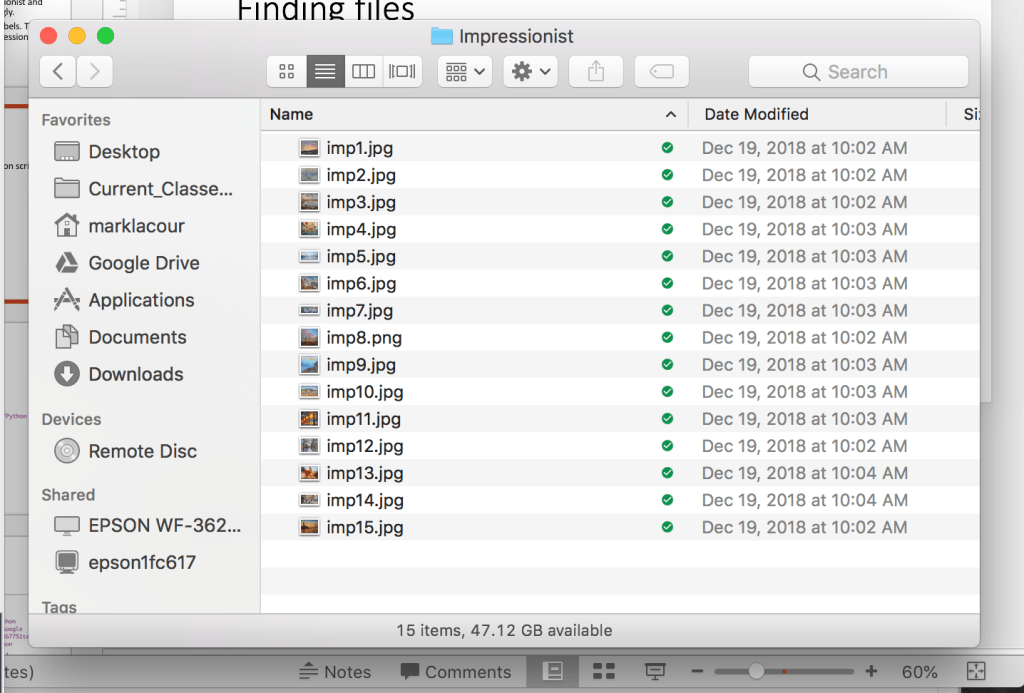
Giving them uniform names is good practice, but not necessary in this case. The “test” folder was the same, but with 7 each of “exp” and “imp” examples.
Dealing with paths
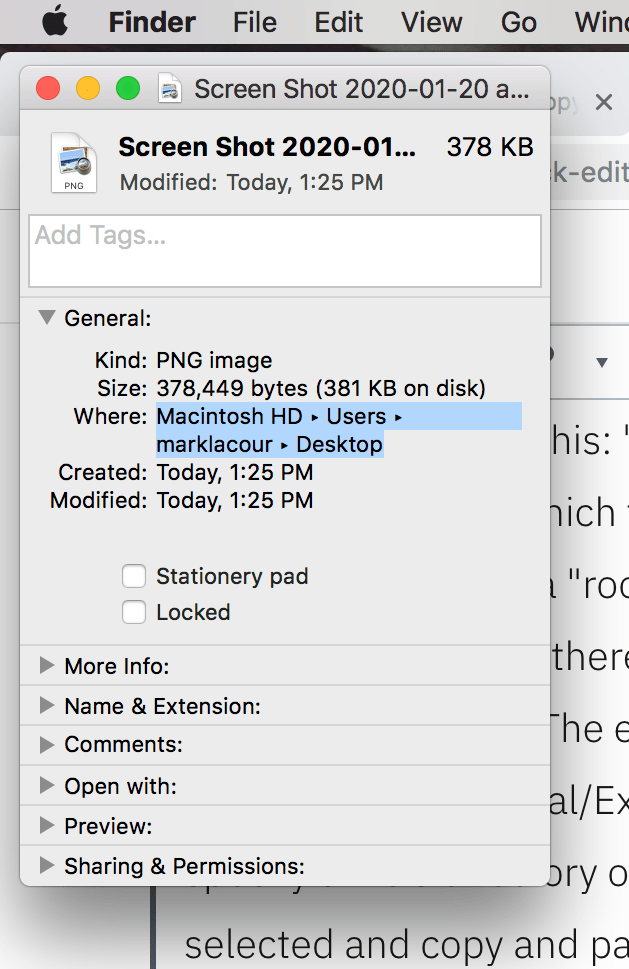
Every file on your computer has a “path” leading to it. On a machine running OS X, it’ll look something like this: ‘/Users/marklacour/Desktop/RA stuff/Python tutorial’. It basically specifies which folders to go through to get to the file(s) you need. Typically, the path starts with a “root directory” and specifies which folders/directories you’d have to double-click from there (separated by forward slashes “/” on OS X machines but back slashes “\” on PCs). The end of the path should end with the file you are trying to use, e.g., ‘…/Python tutorial/Expressionist/Exp1.jpg’. If you’re ever looking for a shortcut to specify a file’s directory on an OS X computer, you click “command + i” while the file is selected and copy and paste the path that appears in the pop up like in the picture below.
After you paste the path, you only need to finish it with the file’s actual name, extension included, e.g., “.py”, “.jpg”. If you use a PC then I’m sure there’s some equally easy way to do that you can Google for yourself. : P
Make a list of image directories
We’re going to work smart instead of hard. We’ll start by importing a library called “os” and then creating a variable storing the path to the folder your “.py” script is being stored in automatically.
import os
currentDirectory = os.getcwd()
The function “os.getcwd()” basically says “get current working directory”. The variable “currentDirectory” will be the path to the folder your script is in.
Now we want to create a list of paths to all the images we’ll be using. A simple way to use this is to use the “glob” library like so.
import glob
Expressionist = glob.glob(currentDirectory+'/Expressionist/*.jpg')
The “glob.glob()” function is allowing us to specify a path to a folder/directory and create a list of file paths for all the files in that directory. Here, we specify with “*.jpg” at the end that we want any file ending in a “.jpg” to be part of the list. If you typed “print(Expressionist) at the end of the script and ran it, you’d get something like what’s in the picture below.
(Note: The image below is a screenshot from the “shell”. If you look at the bottom window, the “Output” of your script is the default tab open, but there’s also a “Shell” tab. When you’re script runs, it creates variables, values assigned to those variables, imports packages, etc. temporarily, and outputs whatever you tell it to into the “Output” tab. If you just want to play around with some code, you can go to the “Shell” tab and do so there. Any variables you define or packages imported will stay that way until you exit Psychopy.)

Each element in the list “Expressionist” is a path to a file ending in “.jpg” within the “Expressionist” folder I created for the study.
Beginning at the beginning
The beginning of the script will look like this:
#   Set up. Importing packages and setting up a window to show stuff in.
from psychopy import visual, event
import time
import os
import random
import glob
import csv
window = visual.Window(monitor="testMonitor", fullscr=True)

#   Get all the picture directories
currentDirectory = os.getcwd()
Expressionist = glob.glob(currentDirectory+'/Expressionist/*.jpg')
Impressionist = glob.glob(currentDirectory+'/Impressionist/*.jpg')
Test = glob.glob(currentDirectory+'/Test/*.jpg')
All the “import” lines are getting scripts ready that we’ll be using later. The “window = ” line is setting up a window to display stuff in, as you should know by now. Finally, everything under the comment “Get all the picture directories” is setting up lists of file paths to all the images organized into collections called “Expressionist”, “Impressionist”, and “Test”.
Manually assign the participant to a condition
For now, we’ll assign participants to the experimental “condition 1” or the control group “condition 2” manually:
#Manually assign a condition
condition=0
condition_assignment = visual.TextStim(window, text='Press 1 for condition 1 \nPress 2 for condition 2')
condition_assignment.draw()
window.flip()
condition_key=event.waitKeys(keyList=['1','2'])
condition=int(condition_key[0])
First, we’re saying “condition = 0”. We’ll want to put it as either “1” or “2” later. We’ll keep it as “0” as a default. When you start specifying what you want the program to do depending on whether they’re in condition “1” or “2”, you’ll start getting error messages if they’re still in “condition 0”. You’ll know that the assignment isn’t working right.
“condition_assignment” is telling the researcher on duty to press the “1” or “2” key to assign the participant to the respective conditions. The next two lines draw and then display this message. “condition_key” is waiting to receive a “1” or “2” input before going on. If you want to add more conditions to your experiment, simply extend the “keyList” to equal [‘1’, ‘2’, ‘3’], [‘1’, ‘2’, ‘3’, ‘4’], or whatever.
The last variable takes this input and converts it to an integer. The variable “condition_key” is stored as a list and the actual key that was pressed is stored as the first (in python-ese, the zeroth) value in that list. That’s why we have “condition_key[0]” in there. I put “int()” around that because the value assigned to “condition_key[0]” is technically a character string, “1”, rather than an integer, 1. Believe it or not, the difference between “1” and 1 is all or nothing in the eyes of python and about 50% of routine problems you will eventually run into while coding is making sure the data you’re handling are all technically in compatible formats.
Show instructions to people in “condition 1”
The following code will show participants assigned to “condition 1” definitions trying to distinguish “expressionist” and “impressionist” paintings with words.
# Show definitions if they're in the experimental condition
if(condition==1):
explanation1 = visual.TextStim(window, text='Expressionist Paintings typically present the world solely from a subjective perspective, distorting it radically for emotional effect in order to evoke moods or ideas. Expressionist artists sought to express the meaning of emotional experience rather than physical reality.')
explanation1.draw()
window.flip()
time.sleep(5)
press_C = visual.TextStim(window, text="Press the C key when you are ready", pos=(0,-0.8))
explanation1.draw()
press_C.draw()
window.flip()
instructions_done=event.waitKeys(keyList=['c'])
explanation2 = visual.TextStim(window, text='Impressionist paintings, on the other hand, typically have small, thin, yet visible brush strokes, open composition, emphasis on accurate depiction of light in its changing qualities (often accenturating the effects of the passage of time), ordinary subject matter, inclusion of movement as a crucial element of human perception and experience, and unusual visual angles.')
explanation2.draw()
window.flip()
time.sleep(5)
press_C = visual.TextStim(window, text="Press the C key when you are ready", pos=(0,-0.8))
explanation2.draw()
press_C.draw()
window.flip()
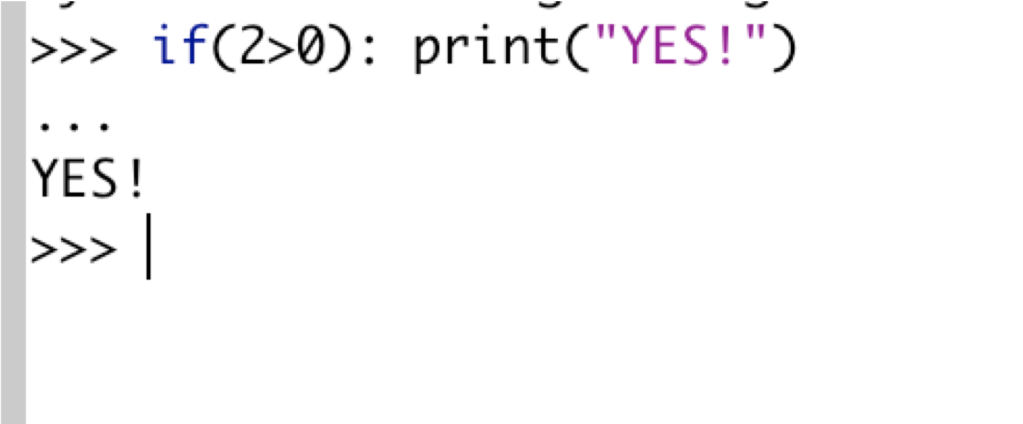
instructions_done=event.waitKeys(keyList=['c'])The most important thing here is the “if(condition==1):” and all lines beneath it being indented. This “if-then” logic is very useful. When you put a logical statement that will evaluate as “True” or “False” in the parentheses, like “if(2>0)” python will execute anything that comes after the colon when those conditions evaluate as “True”.
In the code we’re using, we’re testing the statement “(condition==1)”. “condition” will be assigned a value of 1 or 2 (no quotation marks!). If “condition” was set to a character string like “1”, then you’ll get an error message because no character strings are equal to an integer. You can evaluate, e.g., “(“I like cheese” == “I like cheese”), though in case you’re really bored. In other words, you can test whether character strings are equal to each other or whether certain combinations of characters are in another string, but you cannot test them against integers unless you’re testing the length of the character string or something like that… (see picture below).
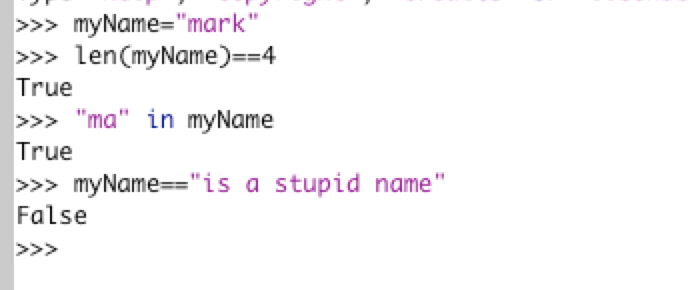
Please don’t test “myName==’is a good name'” because python will claim this is also false.
…anyway, if you pressed “1” when the program asked you to assign the participant to a condition, then this script should have successfully converted it into a 1 (note the lack of quotation marks!), and make “(condition==1)” a True statement. Since the statement is true, python will execute all the indented lines after the colon, “:”. If the statement’s false, like when you assign people to “condition 2”, then python will skip all the indented lines.
All the definitions and whatnot are simply displaying text stimuli, waiting, telling you too press the “C” key when you’re ready to continue beneath the main text after some time. It should all be understandable by now.
Instructions for the study phase
This next bit should be very boiler plate for you by now too.
#Instructions for study phase
intro1 = visual.TextStim(window, text='For the first phase of this study, we will show you several paintings. Each will be labelled as belonging to "1 = Expressionist" or "2 = Impressionist". You will be asked to look at new paintings afterward and decide which of the two categories each one belongs to')
intro1.draw()
window.flip()
time.sleep(5)

press_C = visual.TextStim(window, text="Press the C key when you are ready", pos=(0,-0.8))
intro1.draw()
press_C.draw()
window.flip()
instructions_done=event.waitKeys(keyList=['c'])
These are the instructions that everyone will see, regardless of what condition they were assigned to.
Learning phase
Now for the more interesting stuff: Showing people the labelled pictures for them to try and learn the difference between “expressionist” and “impressionist” paintings.
#Show the stimuli
Training_stimuli=Expressionist+Impressionist
random.shuffle(Training_stimuli)
for i in range(len(Training_stimuli)):
    image = visual.ImageStim(window,Training_stimuli[i])
    image.draw()

    label=""
    if("exp" in Training_stimuli[i]):
        label="1 = Expressionist"
    elif("imp" in Training_stimuli[i]):
        label="2 = Impressionist"

    label_stimuli=visual.TextStim(window, text=label, pos=(0,-0.8))
    label_stimuli.draw()

    window.flip()
    time.sleep(1)
The first line after the comment are adding the list of file paths called “Expressionist” and “Impressionist” together so we end up with all the training stimuli in one list called “Training_stimuli”.
The second line randomizes the order of the stimuli.
“for i in range(len(Training_stimuli)):” is initiating a “for” loop, basically saying, for every number, i, corresponding to the length of “Training_stimuli”, do the following. It’ll basically start i at 0, do everything indented under the “for” loop on the zeroth part of any list that’s indexed with i. In other words, “myList[i]” would be read as “myList[0]” the first time through the “for” loop, then as “myList[1]” the second time, until you reach the end of the range of numbers you wanted to loop through.
The first two indented lines under the “for” loop are creating an image stimulus called “image”. The “ImageStim” function works a lot like “TextStim”. The first argument specifies a window to display the stimulus. The second argument, instead of specifying what the text is, specifies a path to the image you want to display. After that, you “.draw()” and “window.flip()” as you would for a text stimulus, hence the “image.draw()” line right underneath.
The lines starting with ” label=”” ” are labeling each image as “expressionist” or “impressionist”. First, we say that label equals an empty text string, “”, because we don’t want to assign it anything meaningful that will get through our if-then statements later by default. If the if-then statements are working right, we want it to show. Next, we’re say, in plain English, “If the character string ‘exp’ appears anywhere in the current file path, then change label from “” to “1 = Expressionist”. The next line is doing the same thing, except it’s checking whether “imp” is in the path the “for” loop is on at the moment and labelling it appropriately.
The line beginning with “label_stimuli” is creating a text stimulus out of the “label” we just created. The rest is pretty standard by now. We’re saying to draw “label_stimuli”, show it, then wait a second. If you were to actually run this study, you’d want to give participants a lot longer than a single second to look at the label and try to figure out how the current image fits a pattern or a definition.
(Note: You’ll probably want to change “time.sleep(1)” to last more than one second. The participant probably won’t be able to soak up much information in that time, but it’s a good time to have stimuli appear while you’re in the process of writing the basic script and making sure everything generally does what it’s supposed to. Feel free to put your own special number in those parentheses. I won’t be offended.)
Instructions for the test phase
As with the instructions for the learning phase, this should all be pretty standard by now.
#Instructions for test phase
test_intro = visual.TextStim(window, text='We will now show you some new images. Each one is of an expressionist or impressionist painting. Press the "1" key if you think it is an expressionist painting. Press the "2" key if you think it is an impressioinist painting.')
test_intro.draw()
window.flip()
time.sleep(5)
press_C = visual.TextStim(window, text="Press the C key when you are ready", pos=(0,-0.8))
test_intro.draw()
press_C.draw()
window.flip()
instructions_done=event.waitKeys(keyList=['c'])
Test phase (starting to track data to import later)
Finally! Some new stuff! During the test phase, we’re going to keep track of (1) which image was shown on each trial and (2) whether the participant labelled that image as “1” for “expressionist” or “2” for “impressionist. The way we’re going to do this may seem odd, but I find it’s the simplest one to understand as a beginner and is very easy to implement. First, we’re going to store a list of column headers INSIDE A LIST!
#Test phase
participant_data=[["Shown", "Response"]]
The list “[“shown”, “response”]” is being entered as the first, and only, element in a list called “participant_data”. “shown” and “response” are going to end up being the column labels for our data. To add a new row, we’re going to use the command “participant_data.append([<image shown>, <participant response>]). So, we’ll be adding a 2-item list to “participant_data”. You’ll see this in action a few lines down.
First, though, we’ll randomize the order of the test stimuli:
random.shuffle(Test)Next, we’ll create a text stimulus called “label” that will appear at the bottom of each image reminding participants that “1” is for “expressionist” and “2” is for “impressionist”. We’re too nice.
label=visual.TextStim(window,text="1 = Expressionist, 2 = Impressionist", pos=(0,-0.8))
The next lines will loop through each item in “Test”, show each image, wait for a response, etc.
for i in range(len(Test)):
    image = visual.ImageStim(window,Test[i])
    image.draw()
    label.draw()
    window.flip()
    response=event.waitKeys(keyList=['1','2'])
    participant_data.append(Test[i], response[0]])
The last indented line adds a new list to our list-of-lists, the participant’s data. The only problem is that “Test” is a list of paths. These paths are sometimes pretty long and it’d be nice if it only referenced the last element in the path, the image name itself. To fix this, use this line instead:
participant_data.append([os.path.basename(os.path.normpath(Test[i])), response[0]])Export the data
At the end of the study, you’ll want to export their data BEFORE you say “bye” to the participant. If the process by which you export data is even slightly complicated, you don’t want it to start AFTER the program says “bye” to the participant. There’d always be the chance that the program ends up being shut off before the data is done exporting.
#   EXPORT DATA
with open(time.strftime('%m-%d-%y')+time.strftime(' %H%M')+' data.csv', 'w') as csvfile:
    writer = csv.writer(csvfile)
    writer.writerows(participant_data)
The first line usually has a form more like “with open(<name of my new file>, ‘w’)” in the beginning. I put some code in, however, that will name the file as the date and time the study was completed in month-day-year and military time format + “data.csv” at the end. You’ll get names like “01-20-20 1416 data.csv”. If, for whatever reason, you want to reformat the way the files are named, have fun. : P
The second argument, where we put ‘w’, specifies whether you’re writing the file, reading it, etc. The “as csvfile:” bit at the end is telling python that you want to refer to this new file you’re creating on the next indented lines as “csvfile” for convenience.
The next two lines are basically just saying, “for each list in ‘participant_data’, write it as a row in ‘csvfile’.
End of the study
WE close things out with some typical “thanks for stopping by, let the experimenter on duty” message and wait for someone to press the “D” key before actually closing the program. Rather than give it it’s own block, I put it at the end of the “final code” for this post, which has been commented
#   Set up. Importing packages and setting up a window to show stuff in.
from psychopy import visual, event
import time
import os
import random
import glob
import csv
window = visual.Window(monitor="testMonitor", fullscr=True)

#   Get all the picture directories
currentDirectory = os.getcwd()
Expressionist = glob.glob(currentDirectory+'/Expressionist/*.jpg')
Impressionist = glob.glob(currentDirectory+'/Impressionist/*.jpg')
Test = glob.glob(currentDirectory+'/Test/*.jpg')

#Manually assign a condition
condition=0
condition_assignment = visual.TextStim(window, text='Press 1 for condition 1 \nPress 2 for condition 2')
condition_assignment.draw()
window.flip()
condition_key=event.waitKeys(keyList=['1','2'])
condition=int(condition_key[0])

# Show definitions if they're in the experimental condition
if(condition==1):
    explanation1 = visual.TextStim(window, text='Expressionist Paintings typically present the world solely from a subjective perspective, distorting it radically for emotional effect in order to evoke moods or ideas. Expressionist artists sought to express the meaning of emotional experience rather than physical reality.')
    explanation1.draw()
    window.flip()
    time.sleep(5)

    press_C = visual.TextStim(window, text="Press the C key when you are ready", pos=(0,-0.8))
    explanation1.draw()
    press_C.draw()
    window.flip()
    instructions_done=event.waitKeys(keyList=['c'])

    explanation2 = visual.TextStim(window, text='Impressionist paintings, on the other hand, typically have small, thin, yet visible brush strokes, open composition, emphasis on accurate depiction of light in its changing qualities (often accenturating the effects of the passage of time), ordinary subject matter, inclusion of movement as a crucial element of human perception and experience, and unusual visual angles.')
    explanation2.draw()
    window.flip()
    time.sleep(5)

    press_C = visual.TextStim(window, text="Press the C key when you are ready", pos=(0,-0.8))
    explanation2.draw()
    press_C.draw()
    window.flip()
    instructions_done=event.waitKeys(keyList=['c'])

#Instructions for study phase
intro1 = visual.TextStim(window, text='For the first phase of this study, we will show you several paintings. Each will be labelled as belonging to "1 = Expressionist" or "2 = Impressionist". You will be asked to look at new paintings afterward and decide which of the two categories each one belongs to')
intro1.draw()
window.flip()
time.sleep(5)

press_C = visual.TextStim(window, text="Press the C key when you are ready", pos=(0,-0.8))
intro1.draw()
press_C.draw()
window.flip()
instructions_done=event.waitKeys(keyList=['c'])

#Show the stimuli
Training_stimuli=Expressionist+Impressionist
random.shuffle(Training_stimuli)
for i in range(len(Training_stimuli)):
    image = visual.ImageStim(window,Training_stimuli[i])
    image.draw()

    label=""
    if("exp" in Training_stimuli[i]):
        label="1 = Expressionist"
    if("imp" in Training_stimuli[i]):
        label="2 = Impressionist"

    label_stimuli=visual.TextStim(window, text=label, pos=(0,-0.8))
    label_stimuli.draw()

    window.flip()
    time.sleep(1)


#Instructions for test phase
test_intro = visual.TextStim(window, text='We will now show you some new images. Each one is of an expressionist or impressionist painting. Press the "1" key if you think it is an expressionist painting. Press the "2" key if you think it is an impressioinist painting.')
test_intro.draw()
window.flip()
time.sleep(5)
press_C = visual.TextStim(window, text="Press the C key when you are ready", pos=(0,-0.8))
test_intro.draw()
press_C.draw()
window.flip()
instructions_done=event.waitKeys(keyList=['c'])

#Test phase
# "participant_data" is a list, the first element of that list is a 2-item list
# that will be the column headers for the data
participant_data=[["Shown", "Response"]]
random.shuffle(Test)
label=visual.TextStim(window,text="1 = Expressionist,  2 = Impressionist", pos=(0,-0.8))
for i in range(len(Test)):
    image = visual.ImageStim(window,Test[i])
    image.draw()
    label.draw()
    window.flip()
    response=event.waitKeys(keyList=['1','2'])
    # Each time this loop executes, we'll create a list where the first item is
    # the picture they were shown and the second is the participant's response.
    # We'll then add this 2-item list as a new row of the eventual data file
    # as a list in "participant_data"
    participant_data.append([os.path.basename(os.path.normpath(Test[i])), response[0]])


#   EXPORT DATA
with open(time.strftime('%m-%d-%y')+time.strftime(' %H%M')+' data.csv', 'w') as csvfile:
    writer = csv.writer(csvfile)
    writer.writerows(participant_data)


#   END OF STUDY
bye=visual.TextStim(window, text="You are now finished with the study, please inform the researcher on duty.")
bye.draw()
window.flip()
resp_key = event.waitKeys(keyList=['d'])
